Getting Started as an Achievement Developer
Welcome to the world of Achievement Creation!
Basic Concepts
Technically an achievement is a group of conditions that must be met in a particular frame of the video game.
When you launch a game on an emulator with the RetroAchievements feature, the emulator is always checking if those conditions are met in the current frame. When all conditions for a particular achievement are met, it is awarded and the emulator stops checking the conditions for that achievement.
The process of creating an achievement basically involves 3 steps:
Finding a place in the game's RAM where the information you want is stored (examples: level, life bar, time, coins, holding a weapon, get an item, etc.).
Create conditions that must be met in order to award an Achievement.
Test if your achievement is working as expected.
Most likely you'll go back to step 2 and 3 many times to refine the logic of your Achievement.
In this doc we'll see how to accomplish the steps above.
After you're sure your achievement is triggering at the conditions you want, you can submit it to the server. We'll see more about it later.
First Steps
Before start ensure you have an RA emulator from the RetroAchievements Download Page first and create an account so you can log in using the emulator.
In this guide we'll be using RALibRetro with the Genesis Plus GX core to demonstrate, and the game Sonic the Hedgehog. We are using RALibRetro but the same applies for the standalone emulators.
To begin, run the RALibRetro executable and login when prompted. If you have not used the Genesis Plus GX core before, you can install it by going to Settings -> Manage Cores -> selecting Sega Genesis in the drop down menu -> clicking Download to the right of the core name. Once the core is installed, go to File -> Select Core -> Sega Genesis -> Genesis Plus GX. Now that you have the core selected, you'll need to load the game. Go to File -> Load Game and select the Sonic the Hedgehog ROM (we recommend using No Intro ROMs by default).
Memory Inspector
You should now have your main window running Sonic. There are 3 other dialogs we'll be using, which can be found under RetroAchievements in the menu. We'll be dealing with the Memory Inspector first:
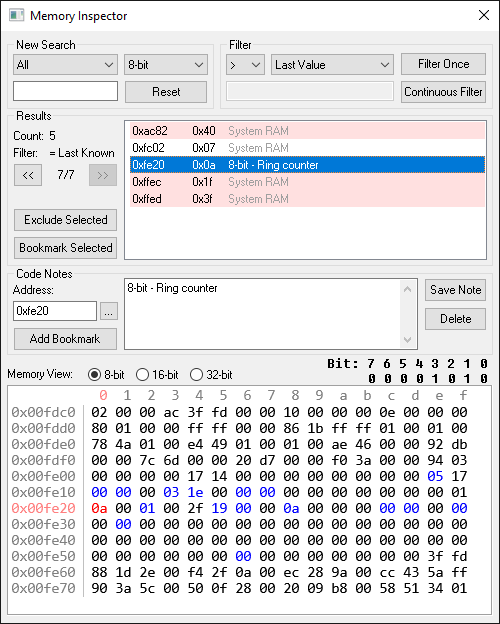
The Memory Inspector can be used to find addresses in RAM for us to use. Essentially you are on a treasure hunt for memory locations - this dialog will help you examine and filter the game's RAM while the game is running.
NOTE: If you want a step-by-step video explanation on finding memory addresses, you can view this updated video.For another video resource, you can view this older video.
See also: Memory Inspector Overview and Memory Digging Tips.
To start or restart a test, click Reset near the top left.
To keep things simple, we'll start by looking for the memory address which holds the number of rings we have collected. Our steps will be the following:
Load the ROM and start a new game.
Reset the memory dialog: click Reset.
Run the first filter: click Filter Once.
Return to the game and change the number of rings in memory. For example, collect a ring.
In the memory dialog, we now want to filter for values that are 'greater than previous values' (symbol
>). We select this, then hit Filter again.
Each time you perform 4 then 5, the number of possibilities or 'candidates' will get smaller. We will continue doing this until the number of candidates reaches a very small number (as few as possible), it can take several attempts. Next we can click in the results window, and monitor the memory address in the memory viewer at the bottom. Continue using the game and you should see the values in memory change as you collect rings. If you don't, or if something doesn't look right, try another value. With the first Sonic the Hedgehog, the memory address for the number of rings should be 0xfe20.
Note 1: Using save states (Shift+F1-F10 to save states, F1-F10 to load states), you can switch back and forth between different states allowing you to alter what is in RAM, and use this to filter out bad candidates. You can search for values that remain the same (I.e. If you know the value didn't change, use
=), or values that are different (use 'not equal', symbol!=). Using the example above, you can collect a ring then use the ">" filter, take a few steps then use the "=" filter (since the number of rings did not change), collect more rings and use the ">" filter again, etc.Note 2: There's unfortunately no guarantee from game to game on how the developers have stored their data (4-bit, 8-bit, 16-bit, binary-coded decimals, negative/inverted, i.e. using 0xff/0xffff to represent 'set', or plain randomly), but eventually you should come across some good addresses. Note if you are struggling to find good values, post in RetroAchievements.org Development Help forum, or RetroAchievements Discord server. There are plenty of people who will be very happy to help!!
Tip: if you'd like to experiment with memory, try entering new values directly into the RAM viewer. This can have devastating effects on the game, or it might do exactly what you expect, (or nothing at all!) It can be useful though, to see if you can enter a value and get the result you expect. Use with caution!
When you've found an address you're happy with, you can write a short note for what it is and hit Save Note, this will store it on database, and will be automatically restored next time you load up the memory viewer for this game, wherever you are! Note that after clicking 'Save Note', the note will be automatically stored on the database, and shared so all developers will share access to these memory notes. They will all be downloaded afresh when you load a ROM. If you try to overwrite a note, it will check with you first before submitting.
You can find more useful Memory Digging Tips here.
Achievement Sets
So the memory location for the number of rings is stored at 0xfe20 - note to a non-programmer, we're dealing in hexadecimal numeral system which can be daunting, but don't worry, essentially it's just numbers and letters instead of only numbers, and not forgetting 0x at the start to show that it's a memory location in hex. We've found an address we're interested in and stored it using Save Note. We now want to create a new achievement.
Go to the RetroAchievements in the menu, choose Achievement Sets and you'll see this dialog:
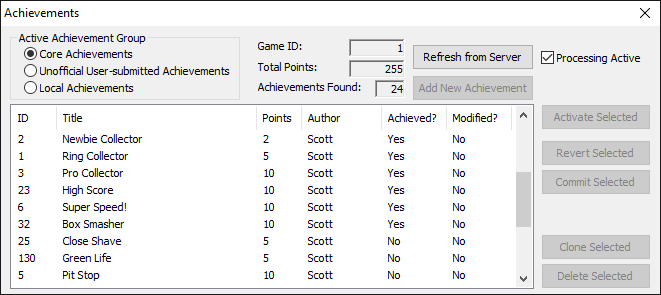
Here we group all the achievements we know about into three sets:
Core Achievements (the main, public Achievement set),
Unofficial/User Achievements (public, but will not award you points: for peer review),
Local Achievements (exclusive to your PC).
In the Achievements dialog, click Local Achievements (top left), then Add New Achievement (top right). This will add a blank entry to the list in the center. Double click on it: if it's not already open, this should select it and open the Achievement Editor dialog.
Achievement Editor
This is how it looks:
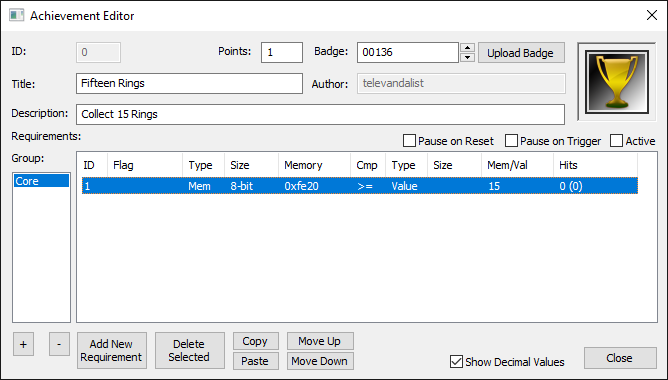
This is the final dialog where we bring all the data together. Most of the top fields are self explanatory, I.e. Title, Description, Points. The main one is the 'Requirements' part.
Let's say we want to add an achievement for collecting a certain number of rings. Let's say 15 rings for simplicity. After filling out the fields at the top and selecting a suitable icon (in this example we used the gold trophy badge (00136), but you can upload a new one), we need to fill out Requirements. We have one requirement, that the number of rings is at least 15. Next click is Add New Requirement.
Clicking this button will add several default values to the Requirements list. These defaults just ensure that something relatively sensible is added to the list. For now, ignoring the field 'Special?'. When we clicked create, the default memory value will be whatever value you last left in the memory dialog.
Next we will change these values to the following:
- Size:
16-bit- we're using 16-bit because the value can exceed 255 (which is 0xff in hex) - Memory:
0xfe20 - Cmp:
>=- this is the comparison to make. We could have any comparison here, but it's sensible to have "greater than or equal to". This is important because if we get 10 rings then a super ring box to have 20, we would miss out having exactly 15 rings. - Type:
Value- we're comparing this memory value to a fixed value: 15 - Size:
Empty- this is only relevant when comparing memory to memory - Mem/Val:
15- the number of rings required: the value we are comparing the memory to - Hit Count:
0- ignore this for now, its useful for when something needs to happen a certain number of times
With that set, we don't have any more conditions to add, so we return to the Achievements Dialog. To be safe, we should save our progress by hitting Save Local! This saves everything to file locally to ensure that we won't lose any progress.
- Note: An achievement should have more than one requirement to avoid it triggering at the wrong time (i.e. playing demo mode). In this example, we are using only one requirement to simplify the explanation. See more Achievement Creation Tips here.
Testing the Achievement
We can now 'activate' this achievement locally by checking the box next to Active on the right-hand side in the Achievement Editor or by selecting the achievement in Achievement Sets and clicking Activate Selected. This will start monitoring these memory locations and will award the achievement once all the conditions are true. Now we can go ahead and test to see if this achievement works!
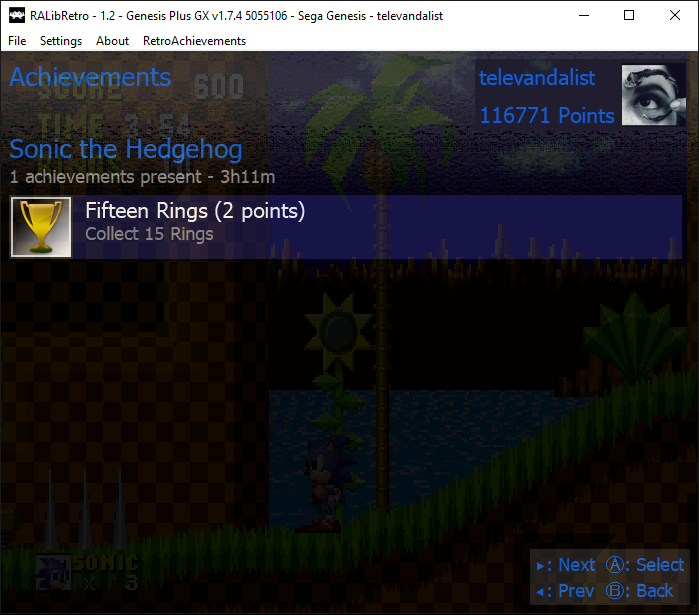
If we press Esc in-game, you will see the achievement show up as a demonstration of what it would look like in the in-game overlay!
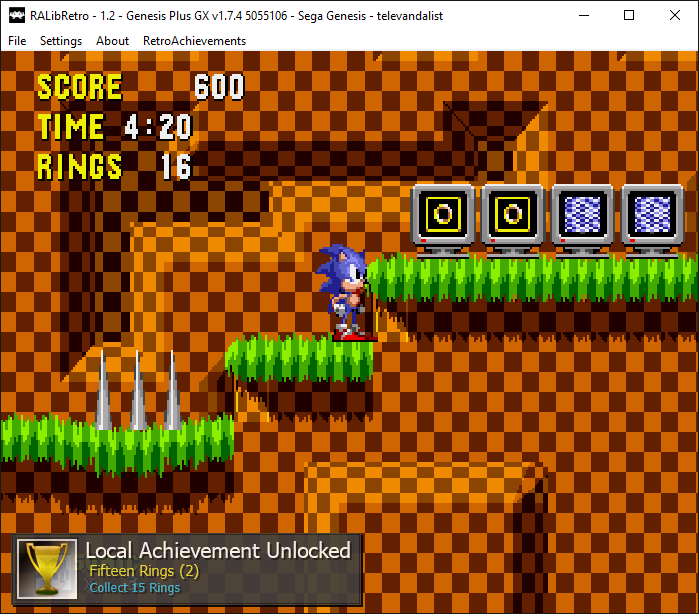
Although the achievement worked fine in our tests, an achievement with logic like that is not ready to be officially released. First of all, it has only one condition: "collected rings >= 15". The problem is that the memory address used to record the number of collected rings is also used when the game runs in "demo mode" (AI playing the game after you wait a while on the title screen). So, if Sonic collects 15 rings in demo mode this achievement will trigger, which is unwanted.
Check the tips in the next section below to know how to improve the logic of your achievement and then make it acceptable to be officially released.
Important Tips
Here are some tips you have to keep in mind when creating your achievements:
NeverAvoid making achievements with only one condition as much as you can. Otherwise it will most likely pop at the wrong time. This is the most common error by a developerIf the game has a demo mode (AI plays the game after you wait a while on the title screen), make sure to find the address for it and add a condition so your achievements don't trigger in demo mode. You'll also need to know how to use PauseIf and ResetIf.
PauseIf cheat codes: If the game has a cheat code to increase lives, select stages, etc., make sure to find the addresses for it and add some kind of protection in your achievements. OK, maybe it's not a very basic topic, but you have to keep it in mind when creating an official achievement set.
Avoid creating achievements for just entering a stage. As it can be earned by a password or a stage select cheat code. It is preferred to make achievements for finishing stages, like in this template here. Also, do not create achievements for just starting a game or "starting a game with character X".
If you want to create an achievement for getting a unique item in the game, add some conditions to make sure the player obtained the item where it is supposed to be obtained, like in this template here. Otherwise the achievement can be earned by using password or loading a saved game.
Avoid making too many achievements about simple things that require minimal effort. Examples of what NOT to do: get one coin or one mushroom on Super Mario Bros.
Be aware of the unwelcome achievement's design concepts.
Be creative with your achievements. Those covering unique features and details of the game are the most welcome. The players love when that little detail of a game they love is supported on an achievement. Reading a walkthrough on GameFAQs can give some inspiration too.
It can take a while to understand how the memory works in a game, so try spending as much time with it as you can, especially if it's your first attempt at developing achievements.
You can find more in the Tips and Tricks page.
Next Steps
Now that you know how to use the Memory Inspector, and the Achievement Editor. It's time to learn new techniques and practice:
In order to refine your achievement logic, you can see what features you have in the Achievement Logic Features page.
Another way to learn is by looking at existing achievements that other devs made with an extra explanation in the Real Examples page.
You can also see some generic examples in the Achievement Templates page.
Once you have learned the basic techniques, you can continue your quest to become an achievement developer by following the steps explained here: How to Become an Achievement Developer
Have fun!