
Screenshot Guidelines
Taking Screenshots
- Screenshots should be taken directly from an emulator's screenshot capture function, using the game's natural resolution. Do not use external screenshot tools (unless you really know what you're doing, the game's display is perfect with nothing external included, and tool's format is high quality PNG) and do not take screenshots of an upscaled window or full screen display. 2D games should generally be pixel perfect and 3D games should be their natural resolution.
- If possible, games on 3D systems can have their internal resolution upscaled by 2x or 3x. Note that this is a special emulator setting, not just resizing the window while it's at 1x internal resolution. This should generally only be done for 3D games (though 2D games can slightly benefit sometimes, especially Wii games), and only when the result looks good - it may not be desirable if the high quality 3D graphics clash too much with low quality upscaled 2D assets (e.g. games with pre-rendered backgrounds and 3D characters), and it shouldn't be done if the game is purely 2D (again, with the exception of Wii and possibly other 2D games that slightly benefit). If used, 3x is preferred over 2x. Never submit 4x or higher.
- For most systems, RALibretro is recommended for taking screenshots, since it generally takes them at an appropriate resolution (though it's always aspect uncorrected, so it's possible some overly wide or narrow screenshots might need to be resized to 4:3 or another standard aspect ratio). RetroArch should be avoided since it generally takes screenshots based on your window size, unless you really know what you're doing with its settings.
- Standalone emulators such as DuckStation, PCSX2, Dolphin, and PPSSPP require configuration to have the appropriate screenshot settings. Please read the Emulator Setup section below.
- Do not manually resize or crop a screenshot just to force a match with the required dimensions. If you're sure you have the appropriate emulator settings and the screenshots are correct for the game, but the site doesn't allow it, it may be an oversight in the list of allowed dimensions for the system. Please report these cases in the
#cleanup-requestsforum or#screenshot-helpchannel in our Discord server if you're sure it's a mistake. - There can be cases where an aspect uncorrected screenshot looks too wide, too narrow, or just not quite right compared to 4:3 or another standard aspect ratio. Amstrad CPC and Uzebox screenshots especially can be too wide, and other systems like PS1 and Saturn can also have these problems. Standalone emulators like DuckStation may have an aspect corrected screenshot option to solve this. But otherwise, you may need to manually resize these screenshots to the game's appropriate resolution using Nearest Neighbor scaling in an image editor. Be sure you know the game's proper resolution and be sure you know how to use Nearest Neighbor scaling if you're dealing with games like this.
Submitting Screenshots
- File size must be under 6 MB to upload.
- Each game allows a maximum of 10 in-game screenshots, in addition to the title screen and completion screen. You don't have to fill all of these slots - the primary in-game shot, title screen, and completion screenshot are what's important.
- Some games lack a typical title screen. In these cases, a screenshot of the title during an opening movie or loading screen may be used. If that doesn't exist, an initial menu screen or gameplay screen may be used.
- Completion screenshots are intended to be "The End" screens that appear after beating the game, whenever possible. If such a screen doesn't exist, or if it's too uninteresting or non-distinct (i.e. pure text on a black background), creativity may be needed in taking a good screenshot during an ending scene, or when finishing the final level, defeating the final boss, winning the final round before looping (for arcade games), etc.
- If a game currently has low quality primary screenshots for both the title screen and in-game shot, please replace both at the same time. Submitting a higher quality replacement for one while leaving the other in lower quality may be rejected.
General Guidelines
- No watermarks are to be present on any images.
- The English language version of the game should be used for screenshots if it exists and it's supported. English fan translations may be used for foreign language games.
- Be sure to carefully look at the existing screenshots for a game before submitting more. Multiple screenshots of the same level or scene aren't that interesting - diversity is preferred (as much as the game allows). Do not rush and submit several screenshots of the first level just for the sake of submitting things. In games with multiple playable characters, like fighting games, don't use just one character.
- Screenshots of menus generally shouldn't be submitted as in-game screenshots unless there's a good reason. Screenshots of gameplay are preferred. Also don't add too many shots of cutscenes at the expense of gameplay (unless it's an especially cinematic game, or something like a visual novel).
- Try to make screenshots interesting in general - not just characters standing in idle poses at the beginning of each level, but shots with more action and energy as well.
- Avoid submitting screenshots of spoilers - scenes that involve plot twists, unexpected characters or unexpected boss fights later in the game, etc. Use your best judgment. (completion screenshots are an exception, of course - the site will automatically obscure them as a spoiler)
- Don't try too hard to be funny or provocative. It may depend on the nature of the game, but in general the screenshots should be neutral - it gets old if they're all trying to be silly.
- Avoid adding potentially controversial or NSFW content. Even if it's in the nature of the game, screenshots (like other content on game pages) should generally steer clear of it. They can be censored if there's no other option.
- If named characters or other forms of user input are present in screenshots, using the canonical character names is recommended if possible, or using "RA" or "Cheevo", or at least normal-sounding names. Don't use nonsense like "AAAAAA" and don't input anything offensive.
- If replacing a low quality primary in-game screenshot, consider reproducing its content if you feel it's interesting, or if it depicts a particularly iconic level or scene or something else that would be missed by the additional screenshots. This is not necessary, but it's something to consider.
System-Specific Guidelines
- Game Boy screenshots should be in black-and-white. Do not use SGB borders. There can be occasional exceptions in color like Pokémon Yellow and certain homebrew games and hacks that are technically Game Boy Color games, but classified as Game Boy on the site.
- Emulator filters and shaders should be disabled for screenshots. For example, Game Boy Color and Game Boy Advance should not use color correction, and Apple II should not use a scanline filter.
- NES color palette can be whatever the default is in your emulator.
- NES screenshots can be either 256x224 (default in FCEUmm core in RALibretro) or 256x240 (default in Mesen core). The latter may be preferred for some games if it shows more detail. FCEUmm can produce this size by changing its top and bottom overscan crop settings to 0.
- Nintendo 64 and Saturn screenshots often have black borders. While not ideal, it's fine to submit these as they are rather than dealing with the various issues from cropping them.
- DS screenshots should include both screens in vertical orientation, without a gap in-between, and with both screens being the same size. Book-style games can have horizontal orientation instead.
- 3DS screenshots should also include both screens in vertical orientation, without a gap in-between. However, the bottom screen will be smaller than the top, and have black space at the sides.
- Atari 2600 screenshots taken in a narrow resolution will automatically have their width doubled to the proper display when uploaded.
- For Amstrad CPC in RALibretro, Caprice32's status bar should be disabled. The crop borders setting can be enabled for some games to remove the excessive border, but this removes part of the display for other games, so be careful with this setting.
- As mentioned above, Amstrad CPC games may produce screenshots that look too wide using the Caprice32 core in RALibretro. It's recommended that you only deal with this system if you understand how the games should be displayed. Be sure to use Nearest Neighbor scaling if you have to resize the screenshots in an image editor.
- Uzebox games may also produce produce screenshots in improper resolutions using the Uzem core in RALibretro. Be sure you know the proper resolution for the game (it can be different for each game) and use Nearest Neighbour scaling to resize the screenshots after taking them.
- PS1, Saturn, Dreamcast, Arcade, and possibly other systems may also produce screenshots that look too wide or too narrow in their uncorrected internal resolution. Again, it's recommended that you only submit screenshots for these systems if you understand the game well and what the best resolution may be. Be sure to use Nearest Neighbor scaling if you have to resize the screenshots in an image editor.
- For PS1, DuckStation can use its aspect corrected Internal Resolution screenshot option to deal with games that come out too wide or too narrow - but this may not be desirable to leave enabled for every game, such as 2D pixel games in 256x224 that would be stretched out to 4:3.
- PS1 in particular can produce different resolutions for the title screen and in-game. If they're in the same aspect ratio (e.g. 640x480 and 512x384) or close enough, and not one of the overly wide or overly narrow resolutions, it's currently fine to submit them without resizing one to match the other. This remains accurate to the level of detail in both.
- Genesis, Sega CD, and possibly other older systems can also have occasional games where the resolution doesn't match between title screen and in-game, or even changes in-game, but it's currently fine to submit them without resizing them and distorting the pixels.
- For PS2, GameCube, and Wii, you may want to use the aspect corrected screenshot option rather than aspect uncorrected if it looks better for the game. This can especially be the case for widescreen Wii games.
- PS2 games should never have widescreen enabled.
- Wii games should generally have widescreen enabled (this should already be the default in Dolphin). However, non-widescreen screenshots can be submitted if widescreen isn't supported by the game or doesn't appear right.
- For PC-88, avoid using Skip Line or Interlace modes (this should already be the default in RAQUASI88).
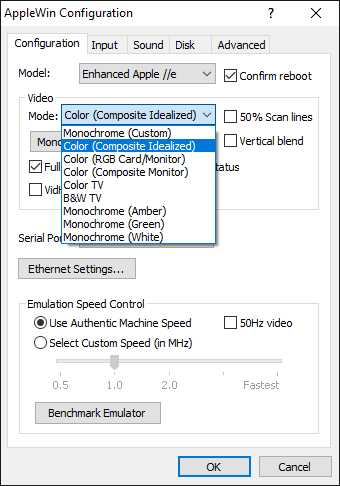
- For Apple II in RAppleWin, disable the 50% Scan Lines option and set Video Mode to Color (Composite Idealized) or Color (RGB Card/Monitor) (may depend on the game). Use Shift + Print Screen to take a 280x192 screenshot (generally preferred), or Print Screen alone to take a 560x384 screenshot (may be required for certain games like text adventures). The screenshot will be in BMP format in the same folder as the game you launched, and it must be converted to PNG format using an image editor before uploading.
Screenshot Dimensions
- Listed below are the standard image dimensions for each system. Some systems may differ depending on the game.
- For 3D systems, only the 1x resolutions are listed here, but 2x and 3x resolutions will automatically be accepted as well.
- A reminder: in general, please do not manually resize or crop your screenshots to match with these dimensions. They should be produced automatically by the emulator with appropriate settings, with some exceptions explained elsewhere on this page. If you believe an error has been made or a proper resolution can be added to the list, please report it in the
#cleanup-requestsforum or#screenshot-helpchannel as explained above. - This list may not always be up to date with the site's configuration if a change is made there without editing this page yet.
- 3DO Interactive Multiplayer - 320x240
- Amstrad CPC - 320x240, 384x272
- Apple II - 280x192, 560x384
- Arcade - Game-dependent
- Arcadia 2001 - 328x269
- Arduboy - 128x64
- Atari 2600 - 160x228 (NTSC), 160x274 (PAL) (Will automatically be doubled in width when uploaded)
- Atari 5200 - 320x228, 336x240
- Atari 7800 - 320x223, 320x272, 320x240, 160x240
- Atari Jaguar - Game-dependent
- Atari Jaguar CD - Game-dependent
- Atari Lynx - 160x102, 102x160
- Atari ST - 320x200
- Bandai WonderSwan - 224x144, 144x224
- ColecoVision - 256x192, 272x240
- Commodore 64 - Game-dependent
- Commodore Amiga - Game-dependent
- Commodore VIC-20 - 200x234
- DOS - Game-dependent
- Elektor TV Games Computer - 328x269
- Epoch Co. Cassette Vision - 128x192
- Epoch Co. Super Cassette Vision - 198x225
- Fairchild Channel F - 306x192
- Famicom Disk System - 256x224, 256x240
- Fujitsu FM Towns - Game-dependent
- GCE Vectrex - 824x1024
- Interton VC 4000 - 328x269
- Magnavox Odyssey 2 - 340x250
- Mattel Intellivision - 352x224, 352x208
- Mega Duck - 160x144
- Microsoft MSX - 272x240, 544x480, 256x192
- Microsoft Xbox - 640x480
- NEC PC Engine CD/TurboGrafx-CD - 256x232, 256x239, 336x239, 352x240, 512x480
- NEC PC Engine/TurboGrafx-16 - 256x232, 256x239, 336x239, 352x240, 320x240, 512x480
- NEC PC-6000 - Game-dependent
- NEC PC-8000/8800 - 640x400
- NEC PC-9800 - 640x400
- NEC PC-FX - 256x232, 256x240, 341x240
- Nintendo 3DS - 400x480
- Nintendo 64 - 320x240, 320x237, 624x460
- Nintendo DS - 256x384, 384x256
- Nintendo DSi - 256x384, 384x256
- Nintendo Entertainment System/Famicom - 256x224, 256x240
- Nintendo Game & Watch - Game-dependent
- Nintendo Game Boy - 160x144
- Nintendo Game Boy Advance - 240x160
- Nintendo Game Boy Color - 160x144
- Nintendo GameCube - 640x480, 640x448, 512x464, 512x480, 640x532, 512x448, 640x528, 576x448, 722x528, 640x491, 583x448, 640x456, 640x500, 640x468, 778x480, 640x464, 640x494, 640x527, 640x568, 700x568, 608x448, 608x449, 608x464, 608x469, 583x480, 640x444, 640x487, 640x512, 700x512, 512x512, 934x512, 640x524, 700x524, 640x446, 640x474, 480x480, 512x450, 583x450, 640x574, 640x484
- Nintendo Pokemon Mini - 96x64, 64x96
- Nintendo Virtual Boy - 320x186, 384x224
- Nintendo Wii - Game-dependent
- Nintendo Wii U - 1280x720
- Nokia N-Gage - 176x208, 320x240
- Philips CD-i - 384x240, 384x280
- Sega 32X - 320x224, 256x224, 320x240
- Sega CD - 320x224, 256x224, 320x240
- Sega Dreamcast - 640x480, 320x240
- Sega Game Gear - 160x144, 256x192, 256x224
- Sega Genesis/Mega Drive - 320x224, 256x224, 320x240
- Sega Master System - 256x192, 256x224, 256x240
- Sega Pico - 320x224, 256x224, 320x240
- Sega Saturn - 320x224, 352x224, 320x240, 352x240, 320x256, 352x256, 640x448, 704x448, 640x480, 704x480, 330x224, 660x448
- Sega SG-1000 - 256x192
- Sharp X1 - 320x200
- Sharp X68000 - Game-dependent
- Sinclair ZX Spectrum - 320x240
- Sinclair ZX81 - 256x192
- SNK Neo Geo CD - 320x224
- SNK Neo Geo Pocket - 160x152
- Sony PlayStation - 320x240, 256x240, 320x480, 256x480, 368x480, 512x480, 640x480, 320x224, 320x268, 512x384, 365x274, 368x240, 640x416, 320x208, 256x224, 299x224, 365x224, 640x448, 640x512, 320x256, 640x536, 715x536, 358x268, 598x448, 512x448, 597x448
- Sony PlayStation 2 - 640x480, 640x448, 640x512, 596x447, 682x512, 512x448, 512x446, 597x448, 512x512, 512x384, 711x480, 711x533, 512x445, 593x445, 640x511, 681x511, 640x447, 640x446, 639x448, 639x479, 512x416, 554x416, 512x417, 556x417, 638x448, 683x512, 512x447, 512x480, 640x481, 512x444
- Sony PlayStation 3 - 1280x720, 1920x1080
- Sony PlayStation Portable - 480x272, 272x480
- Standalone - Game-dependent
- Super Nintendo Entertainment System/Famicom - 256x224, 256x240, 512x448
- TCS Oric - 240x224
- Texas Instruments TI-83 - 96x64
- Thomson TO8 - 672x432
- TIC-80 - 240x136
- Uzebox - Game-dependent
- WASM-4 - 160x160
- Watara Supervision - 160x160
- Zeebo - 800x480
Emulator Setup
DuckStation
- Go to Settings -> Capture and under Screenshots, set Screenshot Size to Internal Resolution (Aspect Uncorrected). If you have reason to believe it's better for the game, you can also use the normal Internal Resolution option (which gives corrected aspect ratio). This can fix screenshots that come out too wide or too narrow when uncorrected, but may be undesirable for other games, such as 2D pixel games in 256x224 that would be stretched out to 4:3.

- To increase the internal resolution by 2x or 3x, go to Settings -> Graphics -> Rendering tab -> Internal Resolution. If you choose to do this, 3x Native is preferred for screenshots. This should generally only be done for 3D games, and only if the result looks good. 2D games generally shouldn't be upscaled, though there may be exceptions that slightly benefit.
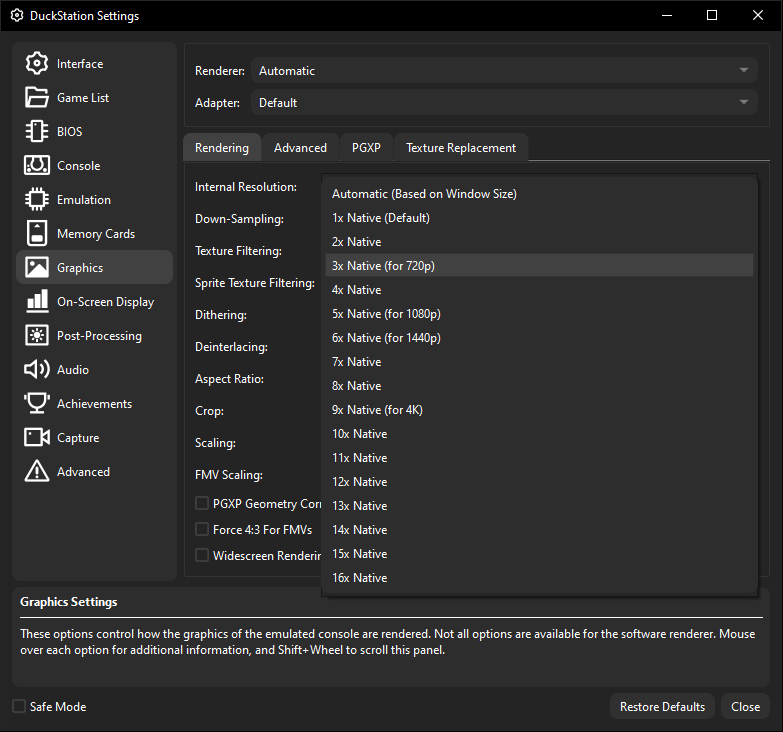
- All other settings can be default.
PCSX2
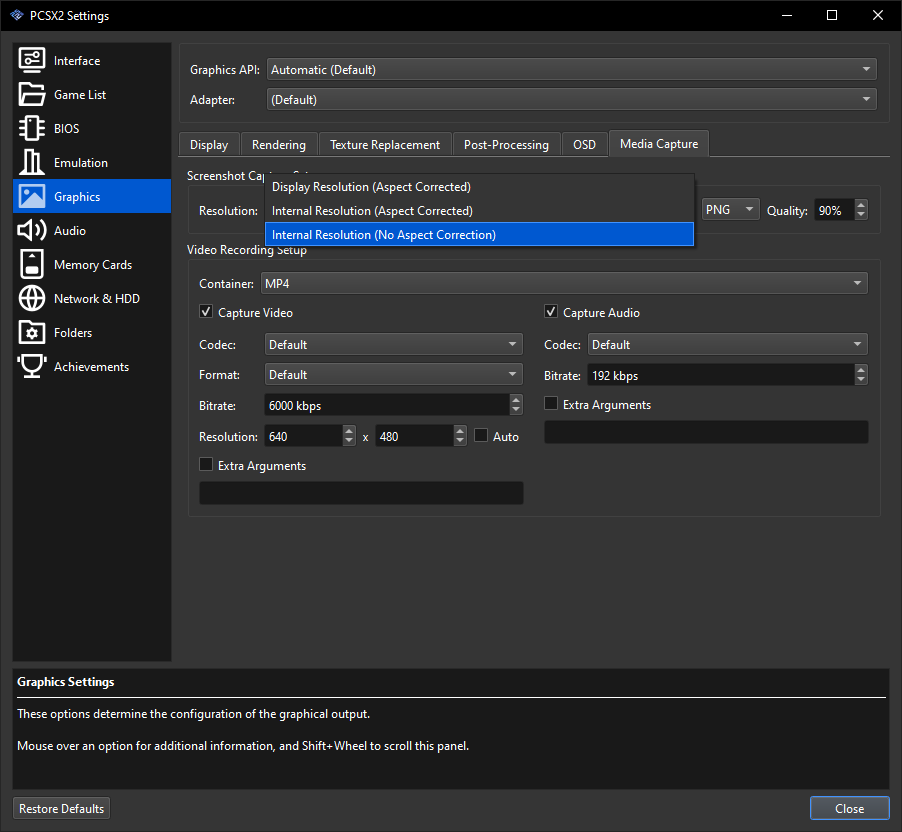
- Go to Settings -> Graphics -> Media Capture tab and under Screenshot Capture Setup, set Resolution to Internal Resolution (No Aspect Correction). If you have reason to believe it's better for the game, you can also use the Internal Resolution (Aspect Corrected) option. No Aspect Correction might feel too narrow sometimes, and Aspect Corrected might be better if it produces rounder circles, etc.
- Also set PNG quality to 90% if it isn't already.
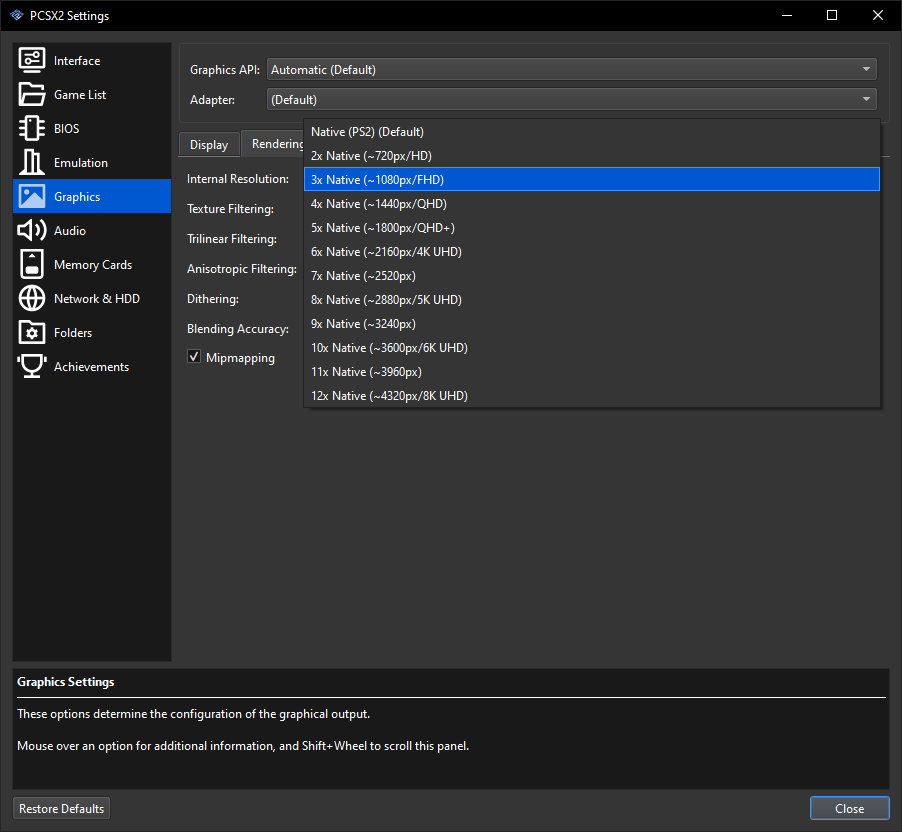
- To increase the internal resolution by 2x or 3x, go to Settings -> Graphics -> Rendering tab -> Internal Resolution. If you choose to do this, 3x Native is preferred for screenshots. This should generally only be done for 3D games, and only if the result looks good. 2D games generally shouldn't be upscaled, though there may be exceptions that slightly benefit.
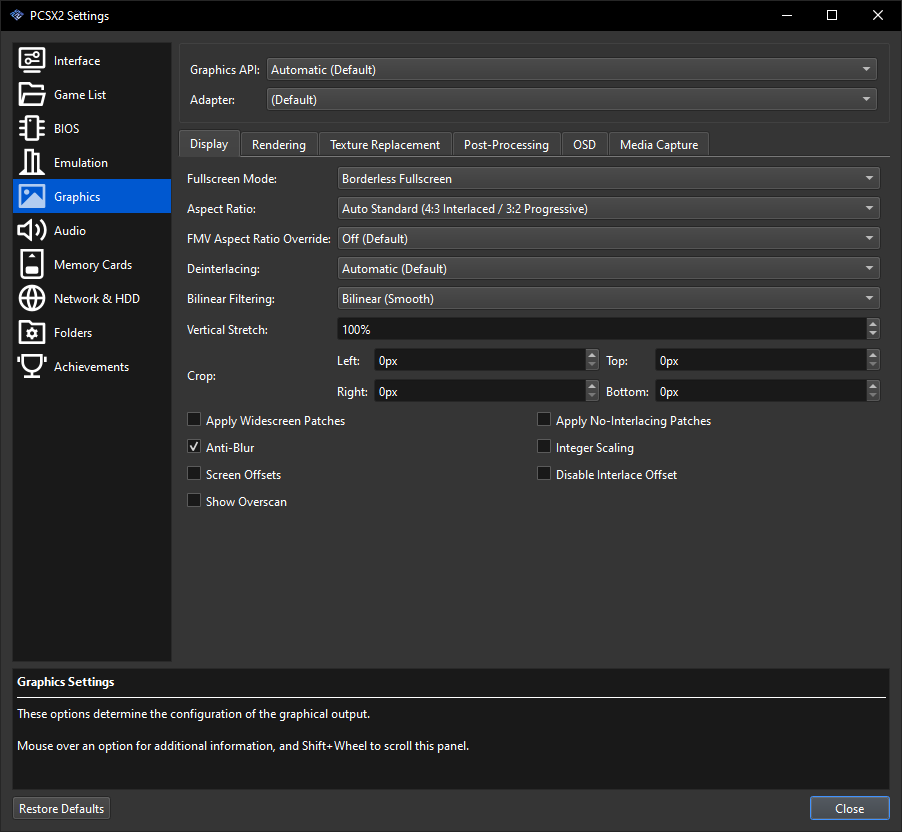
- All other settings can be default, especially Aspect Ratio under the Display tab - this must be the default Auto Standard setting. Widescreen should not be used for PS2 screenshots (just to keep things simple and standard for the system).
Dolphin
- Go to Settings -> Graphics -> Advanced tab and under Frame Dumping, set Resolution Type to Raw Internal Resolution. If you have reason to believe it's better for the game, you can also use the Aspect Ratio Corrected Internal Resolution option. Raw Internal Resolution might feel too narrow sometimes, and Aspect Ratio Corrected might be better if it produces rounder circles, etc. This may especially be the case for widescreen Wii games.
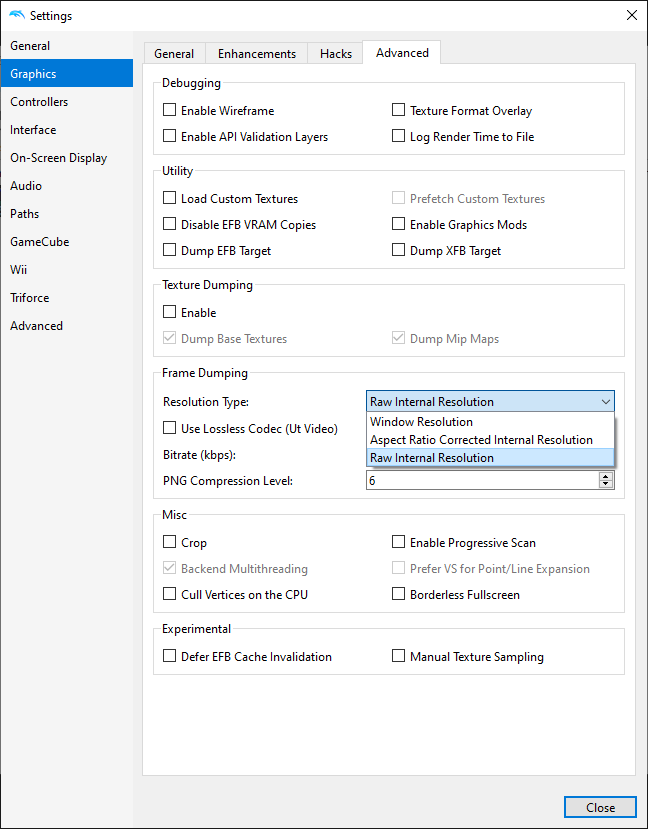
- Widescreen is generally preferred for Wii screenshots, so go to Settings -> Wii and under Misc Settings, make sure Aspect Ratio is set to 16:9 (this should be the default). There can be exceptions for games that don't support or don't look right in widescreen.

- To increase the internal resolution by 2x or 3x, go to Settings -> Graphics -> Enhancements tab -> Internal Resolution. If you choose to do this, 3x Native is preferred for screenshots. While this is mainly for 3D games, it can also benefit the quality of 2D Wii games, moreso than other systems.
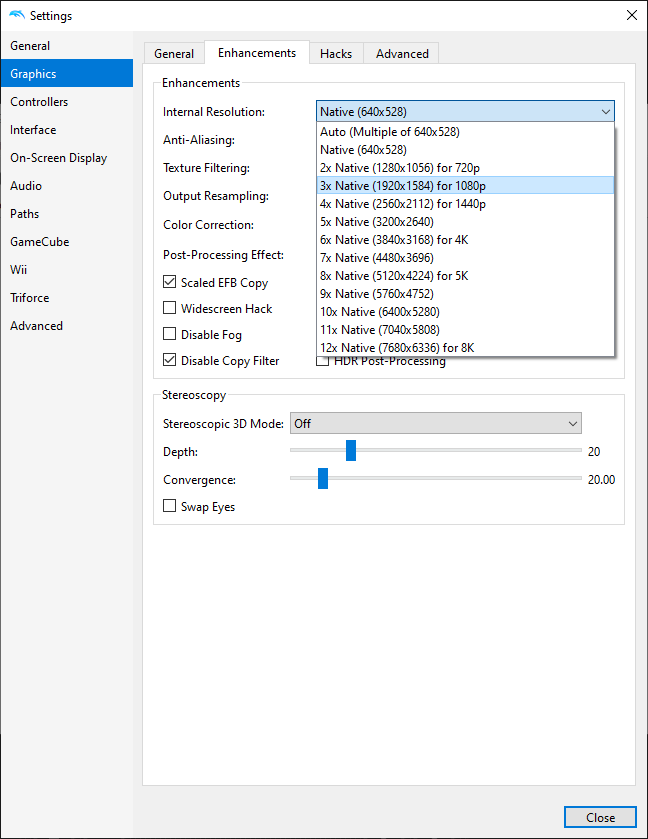
- All other settings can be default. Do not use widescreen for GameCube games.
PPSSPP
- Go to Settings -> System -> General and set Screenshot Mode to Raw Game Image. There may be exceptions if the game produces an improper 512x272 resolution - you can use Final Processed Image in these cases, but make sure your Game Settings -> Window Size is the same as the Rendering Resolution you're using, and make sure there's no other effects being captured.
- Also enable "Save screenshots in PNG format".
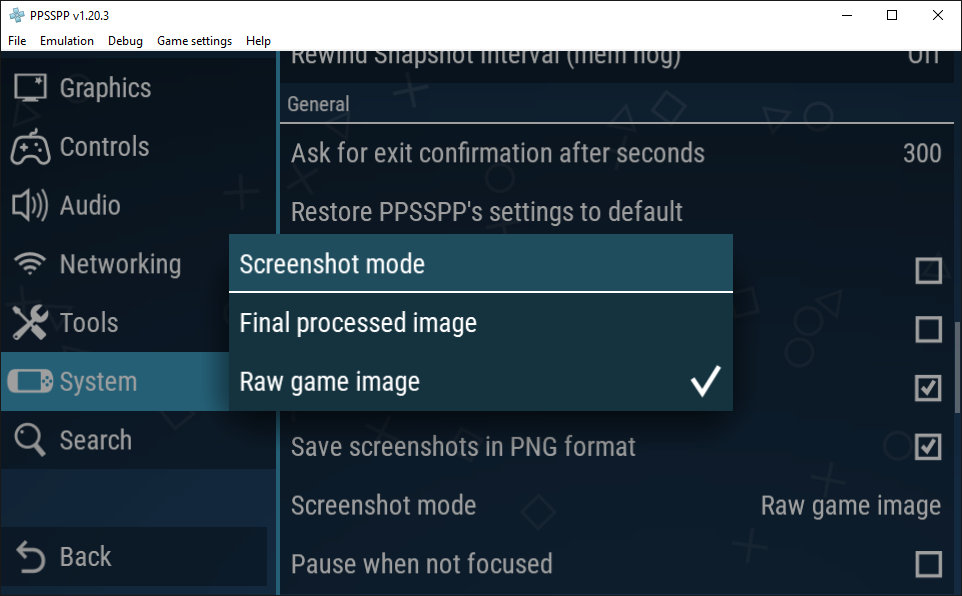
- To increase the internal resolution by 2x or 3x, go to Settings -> Graphics -> Rendering Mode -> Rendering Resolution. If you choose to do this, 3x PSP is preferred for screenshots. This should generally only be done for 3D games, and only if the result looks good. 2D games generally shouldn't be upscaled, though there may be exceptions that slightly benefit. Also note if this setting is set to Auto, the internal resolution will correspond with your Window Size setting.
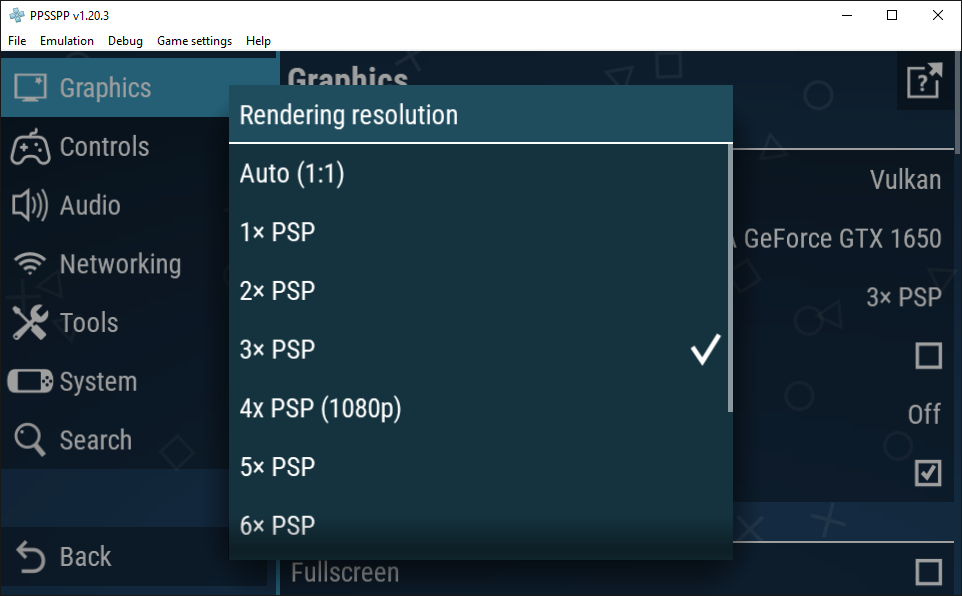
- All other settings can generally be default, but note that changing the Texture Filtering to Nearest may help for some games.
RAppleWin
- Go to Configuration (bottom right button), disable 50% Scan Lines if it isn't already, and set Video Mode to Color (Composite Idealized) or Color (RGB Card/Monitor) (may depend on the game). You can also press F9 (forward) or Shift + F9 (back) to quickly change and test Video Modes in a game. Use Shift + Print Screen to take a 280x192 screenshot (generally preferred), or Print Screen alone to take a 560x384 screenshot (may be required for certain games like text adventures). The screenshot will be in BMP format in the same folder as the game you launched, and it must be converted to PNG format using an image editor before uploading.
RALibretro
SwanStation
- If you wish to increase the internal resolution to 3x here, go to Core Settings -> Enhancement Settings and set Internal Resolution Scale to 3. Leave everything else default. This should generally only be done for 3D games, and only if the result looks good. 2D games generally shouldn't be upscaled, though there may be exceptions that slightly benefit.

Mupen64Plus-Next
- To increase the internal resolution with this core, using the default GLideN64 plugin, go to Core Settings -> GLideN64 and set 4:3 Resolution to 960x720 (x3). Leave everything else default. This should generally only be done for 3D games, and only if the result looks good. 2D games generally shouldn't be upscaled, though there may be exceptions that slightly benefit.

ParaLLEl N64
- To increase the internal resolution here, go to Core Settings -> General and set Resolution to 960x720 (x3). Leave everything else default. This should generally only be done for 3D games, and only if the result looks good. 2D games generally shouldn't be upscaled, though there may be exceptions that slightly benefit.

Flycast
- To increase the internal resolution with this core, go to Core Settings -> Video and set Internal Resolution to 1920x1440 (x3). Leave everything else default. This should generally only be done for 3D games, and only if the result looks good. 2D games generally shouldn't be upscaled, though there may be exceptions that slightly benefit.

DeSmuME
- To increase the internal resolution here, go to Core Settings -> Graphics and set Internal Resolution to 768x576 (x3). Leave everything else default. This should generally only be done for 3D games, and only if the result looks good. 2D games generally shouldn't be upscaled, though there may be exceptions that slightly benefit.

PPSSPP
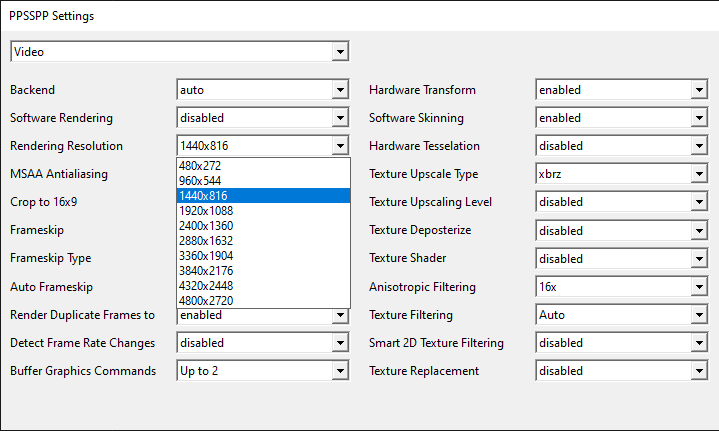
- To increase the internal resolution here, go to Core Settings -> Video and set Rendering Resolution to 1440x816 (x3). Leave everything else default. This should generally only be done for 3D games, and only if the result looks good. 2D games generally shouldn't be upscaled, though there may be exceptions that slightly benefit.
FCEUmm
- To display games at 256x240 instead of 256x224 in FCEUmm, go to Core Settings -> Video and set Crop Vertical Top Overscan and Crop Vertical Bottom to 0. This is already the default setting in the Mesen core, and it may display more detail in some games.

Caprice32
- To remove the Amstrad CPC status bar at the bottom of the screen so it doesn't appear in screenshots, go to Core Settings -> System and set Status Bar to Disabled.

- To crop the excessive borders for some games, go to Core Settings -> Video and set Crop Screen Borders to Enabled. This will cause games to display at 320x240. However, it may crop too far into the display for some games, so be careful with this setting.
